Thursday, 29 December 2011

The Color Workshop - Across the Universe

Good morning, lovelies!

Today I'm going to start reviewing some of the great polishes I got for Christmas. Apparently my family have realised I'm a polish addict: I received no fewer than 24 bottles of nail polish as presents this year! 14 of them actually came as part of a gift set sold at ASDA, along with two nail buffers, a set of toe separators, and tubes of cuticle remover and cuticle cream. Now I have to confess that initially I thought 'oh, how nice, I bet they're not very good though' - it's one of those non-recognisable collections that appears at Christmas and disappears soon after, and past encounters with this sort of thing haven't been that impressive.

Not so the Color Works set. I'm actually really impressed with this one. For one, it contains TWO holo glitters, a silver glitter and a really pretty duochrome that looks perfect for layering. For another, the cuticle remover actually works, and the nail buffers are this great twisty shape that just... works. The polish I've tried so far also has a great formula, but more about that in a moment. I looked up the price and it was a measly £9.99! Unfortunately I forgot to take a picture of the box this time round, but rest assured I'll be swatching all of these polishes very soon, so I'll get it next time ^.^ 


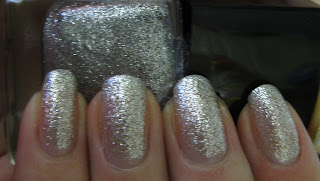
So without further ado, I present Across The Universe. It's a fine silver glitter polish in a clear base, and at first glance it looks like it'll be really sparse - you know how some glitters need 98572 coats to be anywhere near opaque? Well, this isn't one of those. Pictured are just two coats, and not particularly thick ones either. The brush was standard shaped but unusually soft, which actually made things easier since it splayed out easily and made application a breeze. Drying time was impressively fast, and once dry, it's pretty smooth (for a glitter) and shows some pretty decent wear. I wore this for two days, with no topcoat, and it still looked great. It's very sparkly without being garish - it's a shame it's done nothing but rain here recently, or I'd have tried to get a shot of it glittering like mad in the sunshine like it did in the 5 minutes of sunshine I went out in (without a camera, darn it).


Overall, I love this polish - yes, it's just a basic silver glitter, and there's a lot of those out there, but this one works out at 71p a bottle and has the kind of formula I'd expect to see in a polish far more pricey. 


Wednesday, 28 December 2011

SpaRitual : Spirit Child


Hello lovelies! I hope you all had a wonderful holiday, whatever you call this time of year!

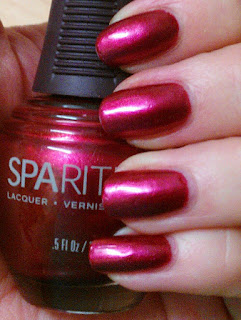
Today I'd like to share with you an especially beautiful polish that I wore as my Christmas day manicure - SpaRitual 'Spirit Child', from the Wilde collection released in autumn this year. These are also hopefully the last pictures I will be posting that have been taken with my old camera - I FINALLY HAVE MY NEW SHINY CAMERA!!! Please excuse me while I happy dance all around the room ^.^


Anyway, Spirit child is a berry red shimmer that looks pretty in the bottle, but until now I'd not gotten around to trying it because it didn't 'grab' me like some other colours. Most of the swatches online didn't excite me that much, either. Now I've tried it, I realise it's STUNNING - but quite hard to take accurate photographs of. On the nail, it's a deep, rich, jewel toned, festive red that just... glows. It's extremely beautiful to look at (I got SO many compliments on this one). The shimmer isn't very obvious on the nail but in the bottle it's definitely there. In bright light it takes on a more berry tone, also pretty. When you photograph it, the berry tone seems to take over and it's all you can see. The bottle shot is about the most accurate of these three pictures, just imagine it slightly less berry toned :)


Application is pretty good - here you see three coats, but it was opaque in two. The reason for three coats here? I chipped it (my fault, not the polish) by smashing my finger against a cutlery rack less than an hour after it dried, and was pressed for time, so just repaired the chip and added a third coat everywhere to make it even! You can see the chip on my ring finger. Drying time was actually quite decent - Sparitual polishes can be rather slow to dry, but this one was significantly faster. I added a quick dry topcoat after the 3rd coat, but the 2nd one dried without assistance in a quite reasonable time. Wear was average to good - it was pretty worn and chipped at the end of the second day, but then again it had survived cooking an enormous dinner for 8 people and unwrapping lots of presents.. including the reluctant packaging of lots of kids' toys. (Why do they make it so hard to get those things out of the box?)


Friday, 23 December 2011

Rimmel I Love Lasting Colour : Azure


Now I know I post quite a lot of Rimmel polishes and I do tend to bang on a fair bit about how great most of them are, how they manage to include a good formula, pretty colours, often a great brush and excellent wear for very little money. However, every so often, one comes along that's just so great that I have to forcibly restrain myself from shoving my nails under people's noses and saying 'look at the pretty!'. One such polish is Rimmel I Love Lasting Finish, in Azure.


Now, I do love me a nice bright blue. I'm still searching for the ultimate eye wateringly bright, electric blue neon, and while this polish from Rimmel isn't quite that holy grail, it's a long way towards it.


(Hey, look! It's my swatching hand, returned at long last from its exile in nubbinsville! Hi there! Long time, no see!)

Azure is a bright electric blue shimmer with a slight hint of frost. It has a standard brush - not one of Rimmel's nice wider ones, sadly, though in truth it doesn't really need one; it goes on nice and smooth and clean and dries at a reasonable speed; my only slight criticism is a tendency to bubble if applied too thickly. 


This picture is a little blurry but it captures the intense electric brightness quite well. Azure is very pigmented and one coat was *almost* enough to be opaque, but not quite: shown is two coats over nail Envy and no top coat. Wear was good too: this mani didn't chip for almost three days and even then it only gave up because I was wrapping presents. I don't know any polish that can survive prolonged exposure to sticky tape!


Isn't it pretty? You can't see it here, but there's also a slight purple flash to this polish; it's not quite a duochrome, but it's trying hard to be. The purple is a lot more evident in the bottle than on the nail; though you do see it at certain angles and in certain lighting. It's very camera shy, though. I took a million pictures and couldn't capture the purple flash no matter what I tried. Oh, well. You'll just have to believe me that it's there... it's like a little secret you only get to see in person :)


Wednesday, 21 December 2011

2 True Crystal Nail Polish : Shade 4 Regal Purple


Today I have an absolute beauty of a polish to show you all: 2 True Crystal polish in shade 4. Like the mysterious turquoise I reviewed recently; it's known only by its number unless you check out the 2 true website, whereupon you discover that it's also called regal purple. Just like the turquoise, it has the same super cheap price of £1.99 (and their 3 for £4.99 offer never seems to end, either), the same great formula that outshines many of the more expensive polishes I own, and the same insane levels of glitteriness that make me rather surprised my camera didn't refuse to focus completely.


It wears like iron, it's opaque in two coats (three shown here for extra depth of colour), and it's absolutely beautiful - really metallic looking, in fact I wish they'd also made this in a fuchsia colour so I could finally stop searching for my holy grail of the perfect metallic fuchsia!


I took about a million pictures of this, trying to capture how awesome it looks - in some lights it takes on a two-tone, almost duochrome effect, moving from magenta purple to a more regal, blueish tone. It reminds me of the foil wrapping you get on certain types of chocolate at Christmas time!


Please excuse the odd lighting and weird finger positions. This is the closest I could get to capturing the insane almost-two-tone metallic glow! 

I can't stress how much I love this polish. It's going to be hard to find something I like more than this one (and at such a cheap price too). I just wish it wasn't limited edition!

Collection 2000 Hot Looks - Spangles

I must apologise for not posting much recently; it's all been a bit manic here with the lead up to Christmas, mad shopping and trying to get work done so I can have 2 weeks off, and quite frankly, swatching hasn't happened much! I've painted my nails intending to photograph them, then life happened and by the time I had the opportunity to take pix, the polish was all chipped. Anyway, hopefully I can make up for it with the posts I've got lined up waiting for you :)


Today's polish isn't even slightly festive looking! I wanted to post lots of Christmassy swatches but nearly all my gorgeous festive polishes are the kind that my camera refuses to work with. So here, for your viewing pleasure, is a polish with a festive name but a very non festive appearance. Yuletide sparkle will have to wait until the new year (4 days til the new camera, people! I'm so excited I might burst!)

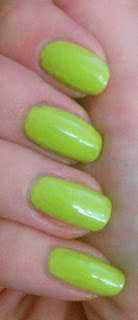
Spangles is one of Collection 2000's Hot Looks polishes, which means cheap and cheerful, quick drying, brightly coloured bottles with a teeny price that more than makes up for any other failings it might have. This one is a particularly bright shade of Acid/Lime/Shrek the Ogre Green (did anyone else expect it to be glittery with a name like Spangles? I know I did, but hey ho. Not the first time a polish was oddly named).


It applies a bit weirdly - I don't know if my bottle was just old, but it tended to be a bit gloopy and even stringy in places. Despite the gloop, it still needed three coats to be properly opaque due to its tendancy to dry patchy and show VNL. Drying time was average; not particularly fast despite its fast dry label, but not painful either. Once dry, it was actually pretty decent to wear - although in these pictures it looks a bit blobbed on and uneven, it actually looks much smoother in real life, and it wore well without chipping for two days.

Now, I know it kind of gives me red lobster hands (mmm, attractive), and maybe lime green isn't really my colour, but I actually quite like this polish. It's cheap and cheerful, a fun and unusual colour, and it makes me smile. It's not the best formula I've ever seen, but it's not terrible either and at the grand price of £1.79 you can't really complain!

Wednesday, 14 December 2011

17 Lasting Fix : Smoke Signal

Much as I loved my festive blue and silver mani, I had an important meeting to attend the following morning, so it was time to exchange it for something more work appropriate. Enter Smoke Signal, from 17.


This sultry grey beauty of a creme doesn't look like much in the bottle, I have to admit. 17 bottles are not the prettiest of things - small, kind of dumpy, and not a particularly interesting shape. The brush is pretty standard, too, though this isn't a bad thing as the formula is actually pretty decent and fancy trick brushes aren't really needed here.


On the nail, it applies really well - it's pigmented enough that with careful application you could get away with one coat (though I have used two here). Drying time is reasonably fast, too, though it dries darker than the cement grey it appears in the bottle. I don't think this is a bad thing, though, as the colour it ends up is a nice rich dark grey that manages to look a little bit vampy. 

(Please excuse the odd skin tone in this picture. The gold bauble freaked my camera out - apparently, even this is too much glitter for its precious little brain -sigh-)

The only fault I can find in this polish is it is ever so slightly chip-prone: you can see there's a small chip on my ring finger nail in these pictures, which happened after only a couple of hours. It also showed tip wear after one day. On a regular polish, that wouldn't bother me too much (I change my mani every couple of days anyway), but this is SUPPOSED to be a lasting finish polish!

Overall, I liked this polish a lot. It's a smart, classy colour that works really well for work, but unusual enough that it looks edgy instead of just boring. It's a good choice when you want something just a bit vampy, but you want a change from black/plum/navy shades. 


Sunday, 11 December 2011

Miss Sporty Crack Me Up Top Coat : Blue

This mani is courtesy of my next door neighbour, who swooped into my house brandishing her new bottle of Miss Sporty Crack Me Up polish, painted my nails with it, then ran away laughing before I could take a picture of the bottle. 

Unhelpfully, I can't seem to find a stock photo of it anywhere, either. So here's a helpful link to the Boots.com website, whereupon you can gaze upon the black version of this polish (you'll just have to picture it in blue, I'm afraid). 


Pictured is one coat, over Rimmel Your Majesty. Like all crackles, it dried quickly to a matte finish (I added a layer of top coat to make it shine). Compared to other crackles I've tried, the crackle effect is a bit more hit and miss. One finger on my other hand didn't crackle at all, and my ring finger on this hand crackled kind of strangely compared to the other nails. 


The cracks also tended to be mostly vertical - not so many crosswise cracks as I saw with the Barry M Instant Nail Effects and Rimmel Crack Your Colour. It was quite sheer, too, which I thought made for quite a nice effect over the silver Rimmel as it turned the blue colour metallic :)

Wear wasn't the best - I had chipping by the end of the day, although this might have been because it was over a manicure that was already two days old, so I wouldn't write it off as an easy chipper until I'd tried it again. Overall, I liked this a lot more than I thought I would - I wasn't that keen on blue crackle until this, but actually it was a pretty nice shade of blue and looked rather festive, especially with the shiny metallic effect it gained from the silver base. 

Rimmel I love Lasting Finish : Your Majesty

Something festive for you today! 


Another one of Rimmel's lovely Lasting Finish polishes, Your Majesty is a beautiful metallic silver polish that I've worn several times now. It goes on nicely with minimal mess - though it's a bit of a glitter bomb when you remove it; your skin will be rather sparkly until you wash your hands. It is very pigmented (one coat could be opaque if you put it on thickly, I used two thin coats) and dries fairly quickly to a bright silver, almost chrome effect shine. It's not a chrome, though - it's pretty sparkly, almost enough that you'd call it a glitter, but not quite. This is a good thing; chromes show every single lump and bump and imperfection in your nail, but that sparkle makes this polish more forgiving. This is my non swatching hand for a reason; my nails on this hand are far from perfect and I don't really want my polish to broadcast that fact to the world!


Here it is without the bottle, in better focus. Apparently bottle + nails is too much twinkle for my camera to handle in one place!

Wear is really good. I wore this alone for two days, then added a crackle polish and wore it for another day. There was no tip wear at all and I only saw chips at the end of the third day. 

An attempt at a Christmassy pose, with glittery tree decoration; cue more freaking out of camera at all the sparkle!

Overall I love this polish. I don't have too many silvers in my collection but most of the ones I've tried have been more like a silvery grey than a proper metallic silver. This one fills that niche nicely and is my go-to silver, with its nice formula and great wear, yet cheap price, it'd be hard to beat this one!

Nails Inc : Saville Row

A nice vampy colour for you today: Saville Row, from Nails Inc.


Saville Row is a deep plum creme that in the bottle has a lovely purplish berry tone; it reminds me of black cherries and loganberries and since I looove that kind of colour, I was quite excited to see it on my nails. Unfortunately it loses most of that colour once it's dry and becomes more of a standard dark burgundy, although still a nice dark vampy shade and especially good for this time of year.


Application was nice and easy, the formula is creamy and pigmented enough to be opaque in two coats, and drying time wasn't bad, either. Wear, however, wasn't the best I've seen: even though I used a base coat and top coat, I had chipping within the day and quite noticeable tip wear, which was a little disappointing for the price Nails Inc charge : £11, though I got this bottle as a give away from a magazine - I don't know whether they used a different formula for their give away polishes but part of me hopes so... if I was to spend £11 on a polish I'd want it to last a bit longer!

Overall I do like this polish and would wear it again (though with an extra coat of topcoat to try and resist the chipping a bit longer), though if I found a similar colour with a longer lasting formula I'd probably switch to that instead.

Thursday, 8 December 2011

Barry M Nail Paint : Berry Ice Cream

Okay so firstly let me apologise up front for the quality of these pictures; I'm still stuck taking pictures on a not very good camera, and although I normally edit my pictures on a computer, this time I tried to do it with the camera's built in editing software. It was meant to just be an experiment to see how the software fared  (I think we know the answer to that one, sigh) and didn't realise that it wouldn't keep the original images. And by the time I realised this, I'd taken off the mani and painted my nails another colour. I'll try and revisit this one another time when I have my new camera (a much awaited christmas present), but for now, here's a lesson in how NOT to take pictures of a manicure.

The poor long suffering nail polish that I've put through this indignation is Berry Ice Cream, from Barry M.


(Image manipulation lesson one: do not use an app that, on cropping an image, automatically blows up what you've got left over to the point everything turns pixellated and blurry. Those are my nails, in case you can't tell any more :-/ )

Berry Ice Cream is aptly named, since it makes me think of ice cream or milkshakes when I look at it. It's a  pink toned lilac creme that's mostly opaque in one coat, although a little prone to bald spots which is why I've used two coats here. It comes in the standard Barry M square bottle with a standard thin brush, nothing revolutionary here although it applies nicely enough, with its thick creamy formula (something that seems to be common amongst pastel toned polishes in general) you don't really need special brushes as you won't have too many problems getting the polish to go (and stay) where it's supposed to be. Like many other pastels, it also takes a while to dry - not unbearably so, but enough that you can't just slap it on and forget about it. It's also rather prone to denting for a while after it's touch dry. This is probably because the thick formula prevents the polish from being applied thinly, so everything just takes longer.


(Lesson two: don't let the app decide to alter your colour balance. The polish will look about the right colour, which is a bonus, but your hand will take on a weird greenish colour and people will think you're an alien)


Once it's properly dry, Berry Ice Cream is really nice to wear. I got two days out of it before the tip wear was noticeable, and it didn't chip until day 3. It did look a little strange against my olive skin tone, since lilac doesn't really suit me (not that I let this stop me - I don't think there's a single colour I wouldn't try), but that's my skin's fault and not the polish! It's a really nice colour and I like how it can't quite seem to decide if it's purple or pink, depending on the light you view it in.

One thing that kept occurring to me whenever I looked at this polish was that it would be really fun to have something this colour, but scented like ice cream. You could have a whole range of shades and scents: mint, berry, vanilla, chocolate... scented nail polish is coming back in at the moment, so maybe I won't have to wait too long before I can enjoy Neapolitan scented nails!


Wednesday, 30 November 2011

Rimmel Lycra Pro : Ultra Violet

I have an unusual colour for you today : Rimmel Lycra Pro, in Ultra Violet.


This bright violet shade was released as part of Rimmel's summer collection in 2011 and I haven't seen many others like this (especially not amongst the drugstore brands) so it definitely stands out on the shelves! It occupies a bright and cheerful niche between neon and pastel and got several compliments from my co-workers when I wore this the other day.


Since it's a Lycra Pro polish, it comes with Rimmel's excellent wide brush that makes application a doddle. The formula itself is well pigmented and very creamy in texture so it applies beautifully and is opaque in two coats over a base coat. Interestingly, in these pictures, my middle finger has bald spots, and that finger does not have a base coat (because I smudged it on first application and re-applied in a hurry). So if you're not going to use a base coat, and you want a perfect application, you might need to use three layers of the Ultra Violet. (Although in real life the bald spots aren't as visible as they are here so it's not that big a deal).

Drying time isn't the greatest - it touch dries fairly quickly but stays tacky and dentable for a while, though this isn't surprising as most polishes with this kind of thick and creamy formula tend to behave the same. I added a layer of quick drying topcoat and the problem was solved :)


Wear was average. The bottle claims that it should last up to ten days, and in general I find Lycra Pro polishes to wear very well (not quite ten days, but at least two or three). This one, however, had tip wear after the first day and chipped (though only slightly) on the second. Again something I've found tends to happen with creamy polishes like this, so not really that surprising.

Overall, a really pretty polish that applies beautifully, needs a little patience (or a quick dry topcoat) for drying and attracts a lot of compliments when worn. I was especially pleased to find that it looks nice against my skin tone, too - normally, any sort of lilac/lavender/paler purple tones look dreadful on me!

Sunday, 27 November 2011

Avon Nailwear Pro : Ruby Slippers


Introducing Ruby Slippers, from Avon. Not to be confused with the China Glaze polish of the same name, this little gem is a lovely, cheerful, bright red polish with silver glitter and it's one of my go-to red shades, especially for toes. In some lights it's a knock your eye out scarlet, in others it takes on more of a cherry tone, and in all lights it makes me smile!


The silver glitter is quite prominent in the bottle, but on the nail it disappears into the red jelly finish and looks more like a red shimmer. This isn't a bad thing though, as it's still very pretty! (Please excuse the strange red patches on my fingers; I had a slight accident with some hair dye...)


Since it's a jelly it's a little sheer - pictured are two coats (with one of topcoat) and it's more or less opaque, though there is still a little VNL - this would most likely disappear if you added a third coat. Application is really easy - the brush is just a standard style, no frills one, and the square bottle lid makes it a little awkward to hold, but the polish itself applies beautifully, dries reasonably fast, and doesn't try to run into your cuticles.
Wear is okay - it chipped on the second day but that was after several hours of rearranging the spare room and general housework. 

Avon polishes used to be rather hit and miss, but they've definitely improved in recent times - and since they're so often on half price special offer, you can usually pick them up for as little as £3. No wonder I have  so many!

Saturday, 26 November 2011

Rimmel 60 Seconds : Green with Envy

Today's polish has driven me insane for two days now. It's almost impossible to get a good, colour accurate picture of it - I thought it was my camera at first, but looking at other swatches online, I see that everyone else has the same problem. So... you might have to bear with me here. I've managed to get the colour more or less right, but only with some pretty unusual settings and lighting ('antique warm' effect with daylight white balance settings under fluorescent lighting in the ladies' loo, anyone?), so these pictures are a little odd looking!


Green with Envy is one of Rimmel's fast dry polishes from their 60 second range. It's a very pretty, vivid metallic jewel toned green that leans towards the turquoise/aqua end of the spectrum. Whenever you try to photograph it, it comes out as a strongly blue toned turquoise with almost no green whatsoever.


This is the most colour accurate picture I could get. Please excuse the horrible lobster red fingers and the way that the picture makes my cuticles look like a rat chewed them; it's a side effect of the bizarre settings I had to use just to make this polish look green. (And it's still not quite right: in real life the green is a little stronger).


Application is a pain. The brush is nice (it's one of those slightly wider ones that make application easier), but the polish itself is a little too thick, and it's prone to brush marks and bubbling (see that huge bubble on my index finger there?). I think this is probably because the bottle claims it's a one coater, hence the thicker formula to try and get away with one coat, but really you need two - one coat on its own wasn't anywhere near bottle colour and had visible streaking.

Drying time is a lot longer than the 60 seconds they claim, but it's nothing a coat of quick drying top coat can't cure (I used Orly Sec 'N' Dry), and once dry, wear is actually quite good. The bottle shots in this review were taken after 48 hours and a lot of typing, and as you can see there is just a little tip wear and no chipping.

Overall, I like this polish a lot, despite the fact it's a bit tricky to apply. The colour is really pretty and I haven't seen too many like this in other brands. I'll definitely wear it again (unless I can find a less tricky dupe elsewhere!)


Wednesday, 23 November 2011

Miss Sporty : Clubbing Colours 328 (Blueberry?)

A very frustrating colour for you today! I've been wearing Miss Sporty 328 for a couple of days now, and it's such a stunning colour but my camera just won't capture it properly, the way it looks on my nails! I can't wait until Christmas when I will be the proud owner of a brand new and much better camera, hopefully I won't have to spend so much time muttering and taking yet another shot of a lovely polish that looks completely different when converted to image form!


Please excuse the blurred picture, but this is literally the one and only shot that I could get where the colour looks true, and even then it's just the colour you see in the bottle. When on the nails, it looks darker in pictures than it does in real life. le sigh.

Anyway. Miss Sporty Polishes are all rather boringly named with numbers, unless you go searching around on the website, whereupon you find out that 328 is actually called Blueberry. I think I've moaned about this already so I'll avoid the rant and just roll my eyes before moving swiftly on (though I have to say, I've never seen a blueberry this colour, but never mind eh?).

(A less blurry, but not quite as colour true bottle shot. It's not as dark as this in real life).

Blueberry is a gorgeous indigo creme - essentially, it's blue, but a very vivid blue that has strong purple leanings. In some lights it looks navy, in others a purplish inky colour. It applies beautifully, with its nice, wide, short brush that reminds me of a smaller version of Rimmel's new style Lycra Pro brush, and the formula is very workable - not too thick, not too runny, dries fast (to be expected, since it's a quick dry polish), and very little clean up required. Pictured are three coats over one of Nail Envy - it was opaque after two, but I added a third because like a total klutz, after the second coat, I managed to squish one against my jeans before it dried and gave myself sheet marks. Yeah. Only I could manage that with a quick drying polish, right?


(The most colour true 'on the nail' shot I could get. See how it's a little purple as well as blue? So pretty!)

Wear is average. I got slight chipping after a few hours, but that was after building an art straw bridge with some kids, and I had a lot of sticky tape sticking to my nails the whole time I was working. I think any polish would have chipped a bit in the face of that treatment! Some of the nails that survived 'BridgeGate' went on to chip by the morning of the second day, so I'd say this isn't the longest lasting polish ever, but it's alright considering it's a super cheap and cheerful drugstore brand, and so long as you don't go picking any fights with sticky tape bridges, you'll get a good day out of it at least!


Monday, 21 November 2011

Color Club : Sugar Plum Yum

A festival of glitter for you today: Color Club Sugar Plum Yum, from the Scent-Suous holiday collection 2011. This collection is exclusive to Sally Beauty Supply and took a lot of people by surprise, mostly because it just kind of appeared one day with next to no fanfare and very little promotion at all. The whole collection is Christmas themed and scented, with three chunky glitters and three foils, and when I saw swatches online I knew I had to try and get them all!


Sugar Plum Yum is a fun combination of hexagon glitters: green (small pieces) and purple (various larger sizes) that smells like fruity candy (I assume it's meant to be sugar plums but I don't know what those actually smell like in real life!). It's also a tease: I took a million pictures of this polish and never quite managed to capture how insanely sparkly and pretty it is in real life. My camera was so overwhelmed by the glitter that it simply refused to focus properly!


Application is.... interesting (though with glitter this chunky, it was never going to be that straightforward!). You can apply it like a regular polish if all you want is a few decorative hexagons over the top of another colour, but if you want a full on glitter mani like this, you're going to have to adopt the 'blob' approach. Scoop out a blob of glitter, plonk it on the centre of the nail, then use the brush to  spread it around a little like you're icing a cake. Luckily, the glitter in this polish is very dense, so this approach is opaque in two coats if you're careful (though you might have to go back and fill in a couple of bare patches here and there).


You may well recoil in horror at the thought of two thick layers of goopy glitter on your nails, visions of an 8 hour drying time flashing before your eyes, but actually it's not that bad. Drying time was impressively fast and the whole thing was dry in about the same amount of time as you'd wait for three coats of regular polish (though not a fast drying variety). Once it's dry, you're left with a very rough surface; the larger hexagons tend to be rather curly and don't lie completely flat on the nail. This wouldn't bother me that much (I'm prepared to forgive a lack of smoothness for the awesome sparkle!) except the glitter kept catching on my hair, so I added two thick coats of Orly Sec 'N' Dry as top coat and the surface was significantly smoothed - still a little bumpy, but I think another coat of Sec 'N' Dry would actually have sorted that out and it'd have been almost as smooth as a non glitter manicure. Interestingly, the top coat seemed to make the glitter sparkle even more!

(Picture taken in different lighting to try and show the sparkle: you can see the purple much better here).

I was a little nervous about these being scented polishes: I've had ones in the past that you could smell three rooms away and which gave me a headache, but happily the scent on Sugar Plum Yum is much more subtle than that and you only really smell it if you put your nails near your face: not so weak that you wonder what the point in bothering with the scent was, but not so strong as to be invasive. Conversely, I could still smell it after those two layers of top coat and the strength was only slightly diminished. My son was most excited about the polish being scented and kept wanting to sniff my nails!


One last attempt to show the glitter, which shows up much better when the image is extremely blurred! This polish really is insanely sparkly and earned me a million compliments. I kept staring at my nails just to see them twinkling ^-^

Sunday, 13 November 2011

Rimmel Crack Your Colour Crazy Top Coat : Silver Clash

This mani is a little different to my others: it doesn't have a proper bottle shot. There's a good reason for this: my sister in law took one look at my nails, hooted, then pounced on the bottle and carried it away triumphantly before I got chance to take a photograph. I guess that's a good advertisment for this polish: Rimmel Crack Your Colour Crazy Top Coat, in Silver Clash.

In lieu of a proper bottle shot, here's a promo image from Rimmel.

Now, I'm the first to admit I'm a little bored of crackle polishes: they were cool and exciting when they first popped up, then every brand and his dog brought out their own version, and they got a bit overexposed. However, this one is silver - actual, sparkly, light reflective silver, so it caught my attention anyway. What can I say... I'm a sucker for metallic/shiny/sparkly polishes!

On to the mani. I layered one coat of Silver Clash over one coat of 2True Shade 39, a basic black creme, and two coats of Nail Envy. I also added a top coat of Orly Sec'n Dry, because when crackle polishes dry, they have a slightly odd rough texture that sets my teeth on edge (I'm the same with terracotta). For the record, it already looked nice and shiny before the topcoat - I just prefer not to wince every time I touch my nails!


Application is a piece of cake. The brush is one of those wide ones so you can cover the whole nail in one or two swipes. If you want chunky crackles like these, you use a thick coat. A thin coat will give you dainty, spidery crackles. Either way, it dries super fast! The crackles take longer to appear than the Barry M polish I already reviewed, and the crack pattern is not quite the same, but it's still attractive (some crackles seem to give a very odd pattern that I don't find as appealing; more of a blobbed-on look).


You can see that Silver Clash is definitely sparkly - I've seen some silver crackles that were more like a slightly silvery grey, but not so here. It's not glitter though, it's just very shimmery silver that catches the light easily because of the uneven texture. I got a ton of compliments on this manicure!

I only wore this mani for 36 hours as I have work in the morning and have to go to a meeting where silver sparkle nails aren't the best idea - but in those 36 hours my nails went through three showers, hardcore housework, laundry and lots of typing as well as many hand washes and a ton of hand cream (the cuticle first aid mission continues!) Despite all this, there was no tip wear, chipping or any other sign of wear whatsoever. 

Another keeper!